Thursday, June 28, 2012

Wedding Flowers

   I saved so much money by making my own bouquets!  I knew I wanted lilies- in fact that was one of the only things that I absolutely knew that I wanted; They have always been my favorite flower.  I chose stargazer lilies because they went perfect with my teal and cranberry wedding colors.  I went around to a couple of places to get quotes for my bridal bouquets and was stopped in my tracks by how much they were charging for them.  The cheapest florist I found was Kroger, but even their prices were way up there.  They quoted $70 for my bouquet and $50 for each bridesmaids bouquet.  At first thought, this really didn't seem that high but then I broke it all down.  (My bouquets were going to be simple- lilies and alstromerias- thats it.)

3 stem lily package - $9.99 (out of season, they are probably even cheaper in the summer)
Alstromeria package - $3.99

   One bouquet probably has 3 lily stems and maybe 2 packages of alstromerias in it which would cost about $18 RETAIL.  The rest of the cost is the little amount of ribbon and wire they use, so we will generously give that about $2.  Which means they are charging $30 per bouquet in labor for one of the simplest bouquets you can get.


   So, I bought some cheap flowers to experiment making my own bouquets.  EASY easy Easy!  It was so much easier than I thought it was going to be.  I bundled some flowers together, rearranging the flowers to look full, and then tied the stems together tightly with a rubber band.  You can also wrap it with floral tape to secure it. Then I cut the stems to all be the same length.  After that, I wrapped some ribbon around the stems to cover up the floral tape/rubber band and hot-glued the end to keep it in place. (I also experimented by not even using tape or rubber band and just wrapping it in ribbon and that worked too!) To add a little detail I put a couple of white push pins in- this also secures it a little more.  The whole process of making a whole bouquet took me around 20 minutes, and that was the first time I ever did something like this.  Try it!  I promise you can make your own, and they will turn out gorgeous!  


  Total cost of flowers for my wedding (includes 1 bridal bouquet, 5 bridesmaid bouquets, 7 boutonnières, 5 crosages, centerpieces for 22 tables, cake and table decor, and enough leftover to decorate the honeymoon sweet, AND tax) was $635.85!  And it could have been cheaper if I didn't want lilies everywhere!  Did I mention I love lilies :)


*Side Notes*
- I did go ahead and pay to have the florist make my boutonnières and corsages.  I probably could have figured out how to make them on my own, but the prices weren't too bad so I saved myself the time.  The boutonnières were $9.99 each and the nosegay corsages were $15.00.
- It would also be cheaper to buy the flowers wholesale. I did not have enough time to research and plan to do this but I know it would have been a cheaper option.  Or at least found a florist to give you a discount for buying so many flowers in bulk.


Wednesday, June 27, 2012

Our Wedding


   I loved my wedding.  Not only because I got to marry my best friend but everything about it was above and beyond what I ever thought it could be.  And this unbelievably fun,  200+ wedding was less than $8,700.  For Real!!!!!  (I recalculated the budget about ten times just to make sure I was seeing it correctly- I still can't believe it!)  And that includes everything: photographer, flowers, food, drink, labor, accommodations, his ring, my dress, thank you presents for bridesmaids, parents, party hosts, invitations, music, bartenders, wedding favors, fabric, miscellaneous items, etc.!!!!

   Now don't go writing it off thinking it was a penny-pinching wedding where we made people stand up during the ceremony and only served water at the reception.  AND don't go thinking we had a super long engagement that allowed me to purchase everything during sales and with coupons.  Nope, we were actually only engaged for 3 months and were able to serve a full meal including alcohol to a guest list of around 220.  However, I can't take all the credit; We were definitely blessed by the Lord with amazing family and friends that pitched in to make the wedding a reality.

   As excited as I am that our wedding was so wonderfully inexpensive, my cup runneth over and I can't wait to share with you how we were able to make everything happen.  Here are a few pictures of the wedding to get you excited, but keep checking back for some great money saving tips!


Monday, June 25, 2012

Make Your Own Refrigerator Magnets


   I made my own refrigerator magnets!  I almost didn't blog about it because its so easy, but I wanted to get the idea out there for anyone that was interested!  I chose to do letters, but you can literally make a magnet out of anything- a picture, a business card, a lego, a bottle cap- anything that is not too heavy.  If you want to make the letter magnets that I made here is what you need:


Hot glue gun
Magnetic buttons 
(you can also get magnetic sheets and then cut them to size- but the buttons are much easier)
Paint markers
Wood letters

   Start off by painting the wood letters.  I chose to paint them all silver, because I didn't want our fridge to look "kiddish", but if you have kids, it would definitely be fun to make them all sorts of colors.  Then hot glue the magnet to the back of the wood letter.  Vuala- you're done!  Haha, told you it was easy!  

   For even simpler magnets, you can use bottle tops from your favorite drinks and put them over the magnet button.  No need to hot glue because the metal sticks to the magnet!  


      Since we are on the subject of magnets- I thought I would share with you one of my favorites:) Hehe!


Friday, June 22, 2012

DIY photo frames

   I made my own photo frames and I am super excited about them!  It was so easy to do and very very cheap!  I started out with $1 frames that I got from the wood section at Michaels. (I'm sure any craft store would have them.)  Then I used scrapbook paper that I found at Walmart on sale!  I'm really diggin this paper because it has tons of leaf and stick designs:)


I cut the scrapbook paper into the shapes of the frames by simply tracing the frames out onto the paper.  Then I Mod Podged the scrapbook paper onto the frames.  A layer straight on the frames, then place the  paper on the frames and Mod Podge over that.  It doesn't have to look perfect, there were parts of the edges that weren't completely covered up, and some paper hung over the edges.  You can tear them off or Mod Podge them to the side.

After the Mod Podge dried, paint the edges and backs of the frames.  I used a foilage green color for the green frame, and black for the red frame.  Blend the edges of the frame and the scrapbook paper- you will paint over a little of the paper, but thats ok.


It doesn't have to be perfectly painted either, little areas of wood that show through give it character.


The heart frame was a little tricky though, because I didn't have a picture that fit completely into the heart.  I put a regular 5x7 picture in it and then covered the back up with left over scrapbook paper.  I also taped the back of the picture and the heart because I didn't want to cut the picture, but all you would have to do is cut the picture and tape it onto the scrapbook paper to make it look more complete.  


I liked the way it looked with a little bit of the scrapbook paper showing with the picture.  If you don't want it to show just use a larger picture to take up the whole space.  Here's to the finished product:


Thursday, June 21, 2012

Newspaper Art

   I love getting ideas from pinterest.  Honesty, I think I'm obsessed, but in a good way!  Recipes, DIY projects, funnies, fashion- the possibilities are endless.  Wil didn't quite agree in the beginning, but after a few cheap upgrades to our home decor and a couple home-cooked gourmet meals, he started to change his mind.  :)

   One of the pinterest ideas I found was to make newspaper art.  It is super easy and looks really neat even if you aren't a good artist:)  Here is the painting I did:


What you need to do this project:

Mod Podge (or anything of the sort)
Paintbrushes
Acrylic Paint of any color
Any size canvas of any kind
Newspaper


-  Start by tearing up your newspaper into smaller pieces.  I did super small pieces and chose to only do the black and white parts of the paper.  I wanted my painting to be all black and white, but I think it could be neat to do colored parts of the newspapers too.  

- Then Mod Podge a section of the canvas, lay a piece of the newpaper on it, and then Mod Podge over the newspaper.  You can be random with the pieces of paper, putting them upside down, sideways etc.  Repeat until the whole canvas is covered.  (This is pretty time consuming, I did it over a couple of days.)

-  After the whole canvas is covered (and dry!) you can start to paint over it.  I knew I wanted to do some sort of bird painting so I searched the internet for inspiration.  I found this beautiful wedding cake that I really liked the design of, so I attempted to recreate it.  At first I tried to trace it out with a pencil, but the pencil wouldn't show up very well over the newspaper, so I ended up just free handing it.  

-  When your painting is dry and exactly how you want it to look, put another coat of Mod Podge over the whole canvas to lock it in.  Once that is dry, you are free to proudly display your artistic ability!


Tuesday, June 19, 2012

Baby Reveal Cupcakes


   I love cupcakes.  I love to eat them, decorate them, look at them, bake them, read books about them, buy them, and share them with others.  Not just any ol' cupcakes though, good-tastin AND good-lookin cupcakes.  Here are a couple examples of the cupcakes I am talking about: 


Most of the ideas for these cupcakes came from the books Whats Up Cupcake? and What's New Cupcake?, but some of them, I'm proud to say, are originals.  


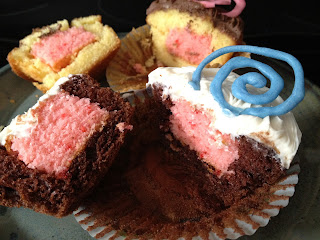
Speaking of originals, one of my couple friends from church decided to have a baby reveal party to find out the sex of their baby.  I was so honored when they asked me to be the one to make the cupcakes!  However, it was a lot harder than I thought it was going to be, not making the cupcakes, but keeping the secret! haha.  The only people that knew the sex of their precious baby were the Doctor and I- for almost a week!!  Goodness that's a hard secret to keep; it sure was worth the wait, though!  Here's how they turned out:


They were having a girl, so of course the inside needed to be pink.  I saw a bunch of ideas online that had colored icing in the middle of the cupcakes, but I really didn't want to do that, because if there was icing on the top and icing in the middle that would make a very sicky-sweet cupcake.  So I decided to make the inside a colored cake instead of colored icing, which turned out perfect, and almost everyone thanked me after they took a bite.


Here's how I made them:  I baked a batch of chocolate cupcakes and a batch of yellow cupcakes normally following the directions on the box.  Then I baked a strawberry cake according to the box. (If you want it to be blue for a boy then you can use white cake and dye it bright blue.) After they were all baked and cooled, I plunged out the middle of all of the cupcakes with a handy cupcake plunger (shout out to my man for giving me this idea) and then just set the insides to the side (or ate them as I went, either way works).  Then I plunged the strawberry cake and stuck them inside the cupcakes.  If you want to be super careful that the colored cake doesn't show through or if you don't want to use icing on the top of the cupcakes then you can put some of the cupcake insides on top of the strawberry cake to pack it in there.  I did this for some of the cupcakes, but realized it wasn't really necessary because I was going to decorate the cupcakes with icing on top which in turn covered up the pink.


Then I iced the yellow cupcakes with chocolate icing and the chocolate cupcakes with vanilla icing.  dashed some blue and pink sprinkles over them and added some blue and pink toppers I made with white chocolate.  I was very please with how they turned out, and even more pleased for my friends that are having a baby girl!!!  

Saturday, June 16, 2012

Daddy's Day


   If you haven't been to Knoxville, Tennessee you need to; It is gorgeous! I had the privilege of visiting there this weekend to spend some time with my daddy for Father's Day!  Sadly, the hubby couldn't join me because he is on a youth retreat with the church this weekend, but I think I found an adequate replacement:)


   One of my favorite things about going home is swinging on the back porch swing or laying on the hammock in the backyard.  I love catching up on life with my parents while enjoying the beautiful lake view.  I don't think it will ever get old, but I am going to savor every second of it!


   I was super excited about the present I got my daddy for Father's Day, too.  He loves history, especially Biblical history; He also loves hymns.  So I got him a book that has a bunch of old hymns in it, and for every hymn it tells who wrote it, when, and the background story on it.  Pretty cool, huh?!  Add a shirt-and-tie card to that, and how could he resist? 

(go to this blog to learn how to make the card)

   What a great weekend!  I would love to hear what you got your dads for Father's Day.  I am always all ears for good gift ideas for dad!  Have a great weekend, and be a blessing!

Friday, June 15, 2012

Scarf Dress


   My most recent obsession right now is scarves.  But not for the obvious reasons of wearing them around your neck- no, my obsession is wearing scarves as dresses!  I know you are probably thinking of the swimsuit coverup type dress, or the tube top tie in the back dress that most of us know how to make with a scarf, but that is NOT what I'm talking about.  This is what I'm talking about:


   Isn't that cute!  The boutique I work at sells Golden Stella scarves, all of which are the most beautiful fabric.  So I have really wanted to get some, however, I really don't wear summer scarves.  I love the look and added flavor to an outfit but they make my neck all sweaty and claustrophobic.  So I searched for ways to wear the scarves as shirts.  I ended up finding an incredible picture tutorial from a boutique in California (Nectar Clothing) that showed me the easiest way to make the cutest scarf shirt.  Here is the link to the boutique's facebook page with the tutorial.  I followed the tutorial on how to tie it, and then kind of made it my own.  I added a belt, and vuala!

(Please excuse the poor photography!)

   However, after I played around and perfected my scarf shirt, I couldn't stop there.  I decided to try a dress out of some of the bigger scarves we have in the store and am in love with the outcome! I tied it the same as the shirt but added a little tie knot at the bottom to make it a little more form-fitting and not so frumpy.  

(The front and back of the side knot.)

(I added a belt to this one, and tied a little knot in the back.)

   I am wearing a gray dress length cami underneath mine which works perfect and is so comfortable.  But if you can't find one, I'm sure a slip would work too.  You can also safety pin the straps of your cami together underneath the bow knot so that they aren't showing.  Make it your own, and let me know how it goes!  Enjoy!