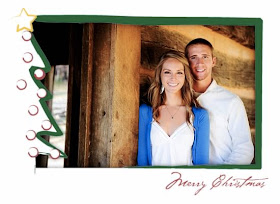
Last year I discovered an easy way to create a Christmas card without breaking the bank. I was on Shutterfly messing around with their editing and discovered a massive stockpile of borders that you can put on your photos (for no additional cost.) At first this seemed almost silly because when in the world would I ever want to put a border on a picture, BUT as I was successfully wasting time dorking up my pictures with crazy borders I hit the jackpot! They have Christmas and holiday borders! Now, just to warn you, some of them are very old-fashioned and un-usuable, but there are a handful of borders that are super cute and are perfect for creating your own Christmas cards. Once you digitally put the border on your photo and save it you can order $.14 prints like any other 4x7 picture. That is saving you about $.80 a card and believe me that can add up! (Also remember once you are done editing your picture with a border and save it, it is like any other picture you would have on your computer so you can order it from anywhere else that might be cheaper than $.14 a print. You don't have to order it from Shutterfly.) This is the border I picked for last years Christmas card:

How cute is that?! Here's how you do it.
1. You have to have an account with Shutterfly and have the photo you want to use uploaded to one of your albums. Select the photo you want to use and click the edit button in the top left corner of the photo. On the scroll down menu select "apply border"
2. It will take you to a screen that looks like this, with the "no border" already selected. You will want to click on the "choose a style" menu bar and scroll all the way to the bottom and select "more."
3. It will take you to a screen that looks like this. This is where are the borders are, so you can scroll down and look through them all. They have them in categories, so if you are looking to do a Christmas card you can stick to the "holiday" or "Christmas" type categories.
4. Click on a border you want to preview and it will apply the border to your photo. I found this one that I absolutely loved, I hope you find one you love too!
5. Once you've picked your border, save your picture. And now you have yourself an inexpensive cute Christmas card! I ended up glueing a Bible verse I printed out on the back and sticking the cards in homemade
Christmas envelopes. It was a fun project that allowed me to send some Christmas love without spending too much money.
I'd love to see how yours turned out! Happy crafting and Merry Christmas!


No comments:
Post a Comment
Note: Only a member of this blog may post a comment.